How to Stop Hosting on Twitch (PC & Mobile)
When you watch live streaming, you get attracted to the creators. Hosting is a popular and good way to support your favorite creator and introduce him to your friends’ circle. Similarly, you might not support a creator, depending on several reasons. Suppose you are observing a creator who is not creating valuable content for Twitch users. You will probably not recommend such a Twitch channel. In this case, it’s better to stop hosting such Twitch channels. Therefore, learning how to stop hosting on Twitch is necessary for everyone.
You don’t need to worry about it, as this guide is based on how to stop hosting any Twitch channel. So, stay with us to get all the relevant information about Twitch hosting.
What Do You Mean By Twitch Hosting?
Twitch host is a very useful feature in which users are allowed to host different broadcasts in their personal circle. Simply, you can host the broadcast on other streams or channels. Another benefit you enjoy is that you can communicate with all the viewers. It’s an excellent feature, and you don’t need to change the chat room while chatting with the viewers.
More specifically, you interact with the audience and help provide better content. Likewise, the valuable creators start getting more audiences from other channels. It is advantageous for both the creators and the hosts.
Methods to Stop Hosting on Twitch
It’s pretty easy to stop hosting anyone on Twitch, but the procedure might differ for individual platforms such as PC, mobile, etc. For your ease, we have shared all the methods with steps to stop hosting on Twitch in the following. Let’s begin!
Method 1: How To Stop Hosting on Twitch Using PC
It’s quite easy and quick to exit the host mode on Twitch. To enable twitch hosting, I recommend you install the “Better TTV extension” to get the host button easily. When you install this extension, it shows the host button in the control panel and makes the overall procedure easier. Likewise, when you want to unhost someone, you will see the button “Unhost channel”. Just click on it, and it’s all done.
What if you don’t get this option but want to unhost someone? Here you have to follow the steps mentioned below to unhost a channel manually.
Step 1: Go to the browser and open the official Twitch website. After that, log in to your account by entering your login credentials.
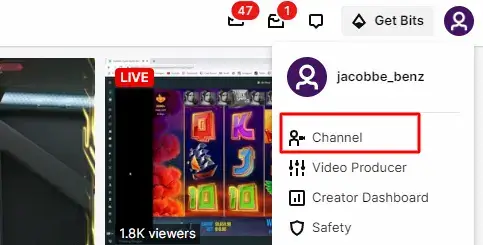
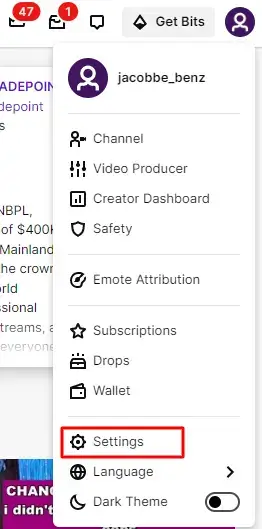
Step 2: Next, click on the profile picture in the upper right corner of the screen and further click on “Channel” from the dropdown menu.
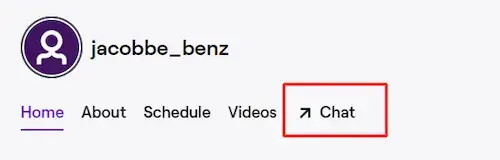
Step 3: Check all the options and click on the “Chat” option. It will open the chat section on the next screen.
Step 4: Write the command “/unhost” in the dedicated chat box and enter.

Step 5: After a bit of loading, you will see a message saying that “Hosting has stopped” on your stream chat window.
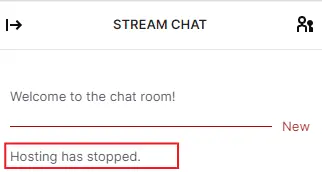
Note: Just enter the proper command mentioned above. Here the command does not require mentioning the channel name or other details.
Method 2: How To Stop Hosting on Twitch Using Mobile Phone
If you don’t have access to a PC or laptop, you can perform this action with the help of your smartphone. You just have the Twitch app installed on your mobile phone. For further details, check out the following procedure.
Step 1: Open the Twitch app on your mobile phone and log in with your account details.
Step 2: Again, find out your profile picture and click on it.
Step 3: Next, you have to click on the “My Channel” option in the dropdown menu.
Step 4: Locate the “Chat” option, and you will find it easily adjacent to the clips tab.
Step 5: Now type the command “/unhost” manually in the dedicated space and click send.
Step 6: Congratulations! You have done with unhosting someone on the Twitch platform.
Steps to Turn OFF Auto-host on the Twitch Platform
Twitch platforms always provide convenient options for their users. For example, you can make a list of the channels that will be auto-host on your channel without any effort. If you want to disable this option, follow the easy steps below:
- Go to the browser, open the Twitch website, and log in with your account details.
- Navigate to the profile picture, click on it, and go to Settings from the dropdown menu.
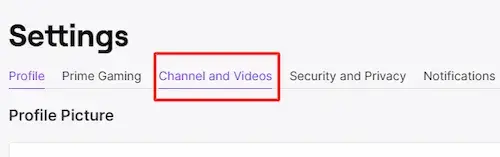
- On the new screen, click on “Channel and videos”.
- Further, select the Featured content option, and here you will find the option “Autohost Channels”.
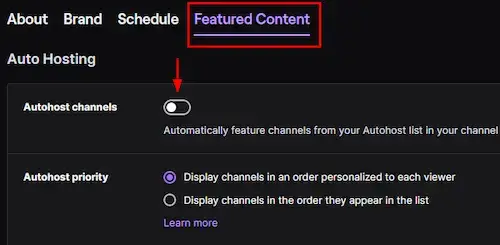
- If this option is enabled, just click on it, and the toggle button will turn it off.
- Congratulations! You have successfully turned off the auto-host option on Twitch.
Should I Auto host on Twitch?
If you find a channel creating valuable or entertaining content for the audience, you should go for an auto-host for that specific channel. Auto-hosting means that you create a white list for the channels you want to host on your channel automatically. It’s the easiest and most convenient way to support the creators and help expand your community. Keep in mind that this option is already enabled for the Twitch partners, and you can change it anytime you want.
FAQs
Bottom Line
In conclusion, hosting on Twitch helps grow your channel. On the other hand, if you are losing your valuable audience, it’s necessary to stop hosting such garbage channels. In this short guide, we have shared all the possible methods to stop hosting someone on Twitch. Use the methods in the right manner and unhost anyone easily.
![How to Fake Donate on Twitch in 4 Different Ways [2024]](https://boostivy.com/wp-content/uploads/2022/08/fake-donate-on-twitch-768x453.webp)